| Home |
| IMPORTANT: | The following assumes that your IBM 5170's motherboard is fitted with IBM 5170 BIOS ROM's, i.e. not swapped out for non-IBM ones. If non-IBM BIOS ROM's are fitted, the following may not work (it depends on the particular BIOS). |
| Assumption: | Per the 'Requirements' section, WinImage has been installed on your 'modern' computer. Note that WinImage 9 is not certified for Windows versions past 7. |
| 2.1 | Obtain a 720K diskette that you are prepared to overwrite. See here for the difference between 720K and 1.44M diskettes. A 1.44M diskette with its density hole suitably covered may work instead - not a legitimate action, but it should work for the purpose of what we are about to do in the following steps. |
| 2.2 | [modern computer] Place the diskette into the 1.44M drive. |
| 2.3 | [modern computer] Download file 5170_gsetup_720k.imz (an image file of a 720K sized IBM DOS 3.3 boot diskette) to your hard drive. |
| 2.4 | [modern computer] In Windows Explorer, double-click on the downloaded 5170_gsetup_720k.imz file. As a result, WinImage should open, showing the contents of the image file. |
| 2.5 | [modern computer] On the WinImage menu bar, select DISK and in the menu shown, verify that the drive selected is your 1.44M one. |
| 2.6 | [modern computer] On the WinImage menu bar, select DISK and then FORMAT AND WRITE DISK. WinImage should start formatting/writing the diskette. |
| 2.7 | [modern computer] When WinImage has finished formatting/writing the diskette, close WinImage. |
| 2.8 | [modern computer] Remove the diskette. |
| MFM type hard drive not present: | The IBM hard drive type number is 0. |
| MFM type hard drive is present: | Click here for information on how to determine the IBM hard drive type number. |
| 4.1 | [5170] Power off the 5170 if it is on. |
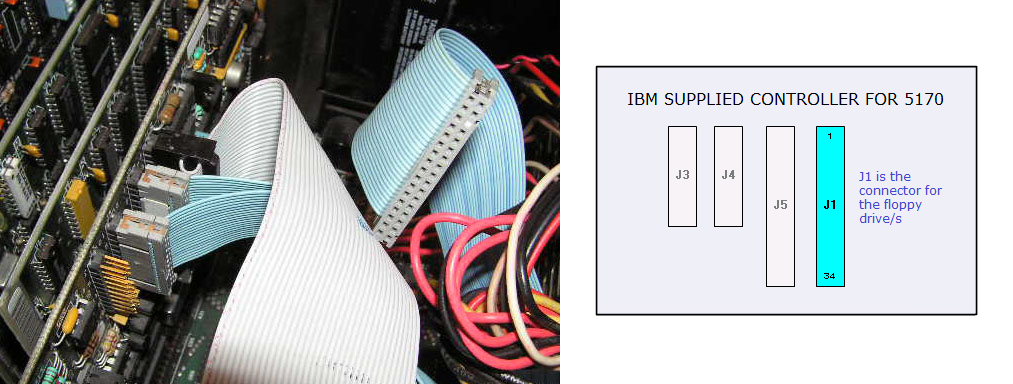
| 4.2 | [5170] At the hard/floppy controller card, remove the 34-pin cable that originates from the 5.25" floppy drive. |
| 4.3 | [5170] In its place, connect the 34-pin cable that itself is connected to the 1.44M diskette drive. Ensure that the cable is plugged in the correct way - pin 1 up. |
| 4.4 | [5170] Connect power to the 1.44M drive. |
| 5.1 | [5170] Insert the GSETUP diskette that you created at step 2 into the 1.44M diskette drive. |
| 5.2 | [5170] Power on the 5170. |
| 5.3 | [5170] At the (RESUME = "F1" KEY) prompt, press the [F1] key. The 5170 should start to boot from the GSETUP diskette. |
| 6.1 | [5170] Type in MEMSIZE then press the [Enter] key. The MEMSIZE program will run. |
| 6.2 | [5170] Note the amount of base memory shown. You will use the amount in a later step. |
| 6.3 | [5170] Note the amount of extended memory shown. You will use the amount in a later step. |
| 7.1 | [5170] Type in GSETUP then press the [Enter] key. The GSETUP program will run. |
| 7.2 | [5170] At the "Press any key to continue" prompt, press the [Enter] key. |
| 7.3 | [5170] Press the [1] key so as to execute the first of the four presented options. |
| 7.4 | [5170] Set up the options in the screen, per: 7.4.1 Set the time. 7.4.2 Set the date. 7.4.3 Set 'Floppy Disk A:' to the 'DS/HD 1.2m' option (because the supplied A: drive in 5170s was a 1.2M one). 7.4.4 Set 'Hard Disk 1 (C:)' to the type number determined at step 3. 7.4.5 Set 'Base memory' to the base memory figure determined at step 6.2 7.4.6 Set 'Expansion memory' to the extended memory figure determined at step 6.3 7.4.7 If the optional maths coprocessor chip (80287) is fitted to the motherboard, set 'Maths Coprocessor' to 'Installed'. |
| 7.5 | [5170] Press the [Esc] key. |
| 7.6 | [5170] Press the [4] key. |
| 7.7 | [5170] Remove the diskette. |
| 7.8 | [5170] Press any key to reboot. |
| 8.1 | [5170] Power off the 5170. |
| 8.2 | [5170] Disconnect the 1.44M diskette drive that was fitted in step 4, then reconnect the 5.25" drive. |