You have been directed to this web page because it has been determined that there is a short-circuit on the +12 volt line of your 5150/5155/5160 motherboard.
We know that the short-circuit is on the motherboard because you were earlier instructed to remove all expansion cards from the motherboard.
It is very highly likely that the tantalum capacitor on the +12 volt line of your motherboard is the component that has become short-circuit.
Faulty tantalum capacitors is a very common problem with the 5150 and 5160 motherboards.
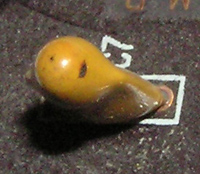
Visually inspecting the tantalum capacitors may (repeat: may) reveal the faulty capacitor.
In some cases, the faulty tantalum capacitor may only have a small black eye/hole, as pictured below.

But the faulty tantalum capacitor may have absolutely no visual indication of failure.
5150 motherboard (PC) - type 16KB-64KB
This is the early version of the 5150 motherboard. It is marked "16KB-64KB CPU"
On this motherboard, sitting on the +12 volt line are: all RAM chips, and five tantalum capacitors.
Any of those may have gone short-circuit, however history suggests that the short-circuit is most likely in one of the five tantalum capacitors.
Click here to see a photo that shows the five capacitors.
On this motherboard, the four of the five that are grouped together, are very important to the operation of the RAM on the motherboard.
I suggest that you replace all five capactors with new ones. The capacitors are of value: 10µF/16V
They need to be inserted correctly - positive leg into positive hole and negative leg into negative hole. Click here to see a photo.
If possible, use the technique shown at here, because on a 5150 motherboard, soldering the ground and/or power lines on the PCB is problematic, and you you could end up damaging the PCB.
5150 motherboard (PC) - type 64KB-256KB
This is the later version of the 5150 motherboard. It is marked "64KB-256KB CPU"
On this motherboard, only one component is on the +12 volt line, and that component is a tantalum capacitor.
Click here to see a photo that shows the capacitor.
That particular capacitor is not critical to the operation of this motherboard, and this motherboard can operate without it.
Remove the capacitor either by desoldering, or by using a pair of sidecutters to cut the capacitor off the board.
If possible, use the technique shown at here, because on a 5150 motherboard, soldering the ground and/or power lines on the PCB is problematic, and you you could end up damaging the PCB.
Your motherboard should work after the capacitor has been removed (noting that in rare cases, the power supply may need more than the motherboard to adequately load it).
The reason that this capacitor is not critical to operation, is because, on the 64KB-256KB type of 5150 motherboard, it filters only the +12 volt line going to the expansion slots. More information at here.
Should you later wish to solder in a replacement capacitor (the recommended action), then click here for replacement details.
5155 motherboard (Portable PC)
The 5155 contains an early 5160 motherboard. Refer to the 5160 motherboard section that follows.
5160 motherboard (XT)
On a 5160 motherboard (of both types), only one component is on the +12 volt line, and that component is a tantalum capacitor.
Of the many tantalum capacitors on this motherboard, it is the one labeled C56 (photo here)
That particular capacitor is not critical to the operation of this motherboard, and this motherboard can operate without it.
Remove the capacitor either by desoldering, or by using a pair of sidecutters to cut the capacitor off the board.
If possible, use the technique shown at here, because on a 5160 motherboard, soldering the ground and/or power lines on the PCB is problematic, and you you could end up damaging the PCB.
Your motherboard should work after the capacitor has been removed (noting that in rare cases, the power supply may need more than the motherboard to adequately load it).
The reason that this capacitor is not critical to operation, is because, on the 5160 motherboard, it filters only the +12 volt line going to the expansion slots. More information at here.
Should you later wish to solder in a replacement capacitor (the recommended action), then click here for replacement details.
