Spreadsheet Add-in User's Guide for Excel
Drill-through consists of the following tasks:
- Accessing Drill-Through from Essbase Spreadsheet Add-in
- Selecting Drill-Through Reports to View or Customize
- Selecting and Ordering Columns
- Sorting Data
- Filtering Data
The following sections describe each of these tasks and step you through a
live working drill-through session.
From Essbase Spreadsheet Add-in, you can access detail-level drill-through
reports that are based on the member intersections of Essbase data cells in
the sheet. Each drill-through report has been predefined by an
administrator at your organization; that is, each drill-through report is
already set up to retrieve specific columns from the relational source, to
sort data in these columns in specific ways, and so forth. Using the
Drill-Through Wizard, you can customize these predefined drill-through reports
to retrieve only the data you want, displayed in a specific way.
To access the predefined drill-through report, double-click a drill-through
cell in the spreadsheet (or select a range of cells and select Essbase >
Linked Objects).
You can set styles for cells tagged as drill-through to help identify which
cells in the sheet are associated with drill-through reports. When you
double-click a drill-through cell, Essbase displays the Linked Objects Browser
dialog box, which displays an drill-through report entry. A single cell
can have multiple reports associated with it. The Linked Objects
Browser dialog box also displays entries for linked partitions and other
linked object types, such as cell notes, URLs, and application files.
After you view or customize the drill-through report, Essbase Integration
Services retrieves data from the relational source and displays the results in
a new spreadsheet.
Before starting the drill-through tutorial, perform the following
tasks:
- Open a sample Excel file that contains the appropriate member
intersections from the sample database for the drill-through report.
This file, Essdt.xls, is provided as part of the default
Essbase installation.
- Set a style for data cells that are associated with drill-through
reports.
To access the sample file and sample database:
- Start Excel.
- Select File > Open and open the Essdt.xls
file from the Essbase\client\sample directory.
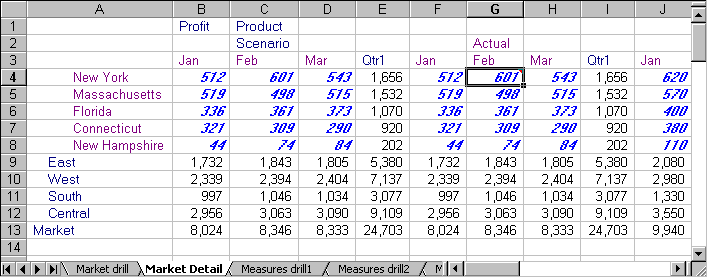
The sample file should look like the following screen. Note that the
Market Detail tab is selected in this example. The default tab that is
selected when you first open the file may be different.
Figure 179. Sample Excel File for Drill-Through
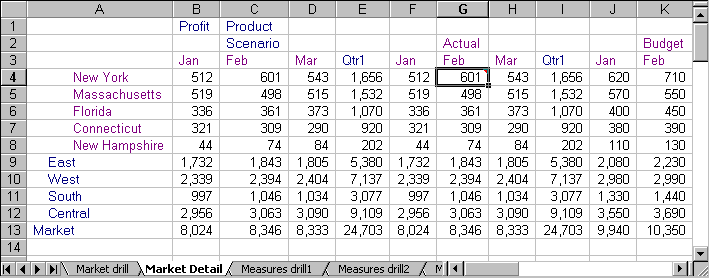
The sample file shows data for specific members of an Essbase database.
This sample file contains the following three predefined drill-through
reports, indicated by the tabs of the spreadsheet: "Market
Detail," "Measures Detail," and "Product Detail."
Using drill-through, you can access these reports and customize them so that
Essbase Integration Services retrieves only the data you need and displays it
in the desired format.
- Select the Market Detail tab on the spreadsheet.
- Select Essbase > Connect and connect to the appropriate
sample database.
- Note:
- A specific sample database for drill-through is not automatically provided
with Essbase Integration Services. For information on the sample
database, contact the person at your organization who installs Essbase
Integration Services to set up a database for you.
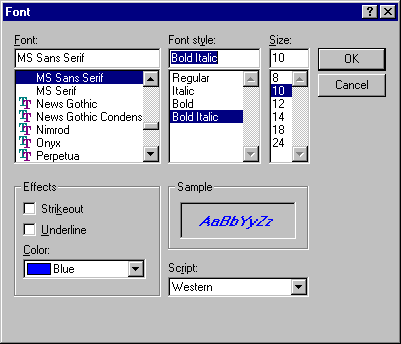
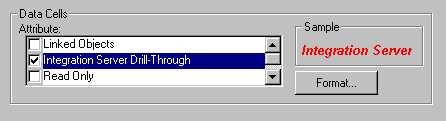
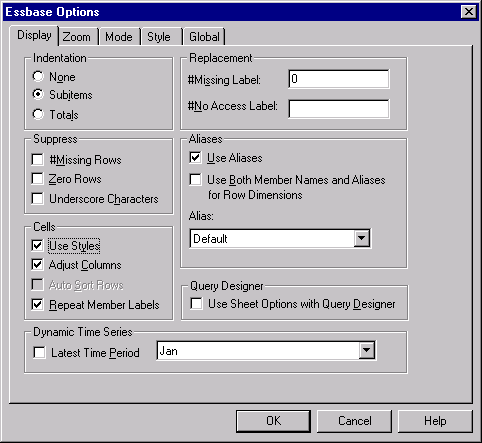
- Select Essbase > Options and select the Style
tab.
- In the Data Cells option group, select the Integration
Server Drill-Through check box and click Format.
Essbase displays the Font dialog box.
- Select Bold Italic from the Font style list
box.
- Select Blue from the Color drop-down list, and click
OK to return to the Essbase Options dialog box.
Figure 180. Font Dialog Box Selection
- Note:
- In the Essbase Options dialog box, Essbase displays an example of the
selected style in the Sample box.
The following screen shows how the Essbase Options Style tab
looks with the style for drill-through cells defined:
Figure 181. Sample Style for Drill-Through Data Cells
- In the Essbase Options dialog box, select the
Display tab, and then select the Use Styles check
box.
Figure 182. Setting the Use Styles Option
- Click OK to close the Essbase Options dialog
box.
- Select Essbase > Retrieve to display the new style in the
spreadsheet.
In Figure Figure 183, the sample drill-through report is associated with the data
cells for Actual, Profit, and Product at the month and Eastern state levels,
so that these data cells are displayed in blue, bold, italic font.
Figure 183. Sample Excel File with Drill-Through Style Applied
To access the sample drill-through report from Essbase Spreadsheet
Add-in:
- Select any drill-through cell; for example, cell G4.
Figure 184. Selecting a Drill-Through Cell
- Note:
-
You can also select a continuous range of cells in the sheet to display all
drill-through reports associated with cells you select. In this
example, we have only one drill-through report attached to the range of
cells.
- Select Essbase > Linked Objects to open the Linked
Objects Browser dialog box.
Alternatively, select the Enable Linked Object Browsing check box
in the Essbase Options dialog box (Global tab), which
enables you to double-click a linked object cell to open the Linked
Objects Browser dialog box. This option works only with
single-cell selection. If you select a range of cells, use the
Essbase > Linked Objects menu command.
Figure 185. Linked Objects Browser Dialog Box with Drill-Through Entry Selected
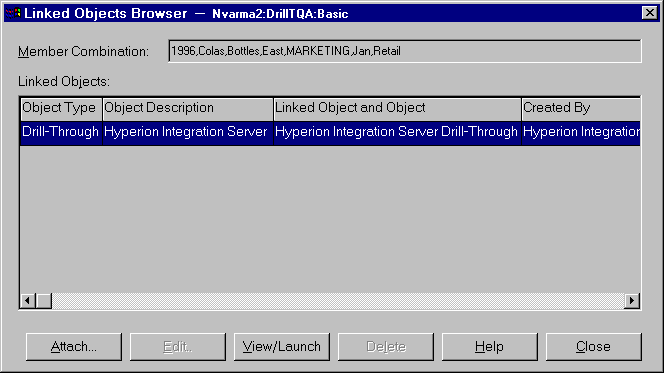
- Select the drill-through report entry and click
View/Launch.
- In the Select Drill-Through Report dialog box, select Market
detail and click Execute.
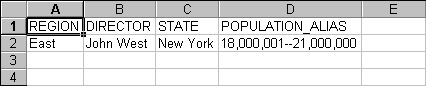
The results of the drill-through report are displayed in a
spreadsheet.The results of the Market Detail report shows that the
regional director for the East region is John West and that the population for
New York is between 18,000,001-21,000,000.
Figure 186. Results of Market Detail Drill-Through Report
- Note:
-
If there is only one report available for the cells you select in the
spreadsheet, and if that report is not designed to be customized,
drill-through generates the report and immediately displays the results in the
spreadsheet. The person at your organization who develops drill-through
reports specifies whether you can customize a report and whether you need to
log in to drill-through and the relational data source.
- Follow the steps in the next section, "Selecting Drill-Through Reports to View or Customize" to select a report to customize.
After you launch drill-through from the Linked Objects Browser dialog box,
Essbase Integration Services displays the Select Drill-Through Report dialog
box under the following conditions:
- More than one drill-through report exists for the cell or cell range that
you select in the spreadsheet, or
- Only one report exists, but you have the option of customizing it using
the Drill-Through Wizard.
The Select Drill-Through Report dialog box displays the list of drill-through
reports available for the cells you select in the spreadsheet.
Depending on how a report is defined in Integration Services Console, you may
have access only to view, not customize, the report.
- Note:
- Tasks that you should not perform as part of the tutorial are
shown in light colored boxes.
|
The sample report used for this tutorial is the Measures Detail
report. You will use the Drill-Through Wizard to customize this sample
report. To execute a predefined drill-through report without
customizing it, perform these tasks:
- Select the report that you want to view from the Available
Reports list box.
- Click Execute.
Essbase Integration Services retrieves the data from the relational source
and displays the results in a new spreadsheet. The new sheet is added
before the current sheet.
|
To
customize the sample drill-through report:
- In Essdt.xls, select the Measures Detail
tab.
- Select Essbase > Connect and connect to the appropriate
sample database.
- Note:
- A specific sample database for drill-through is not automatically provided
with Essbase Integration Services. For information on the sample
database, contact the person at your organization who installs Essbase
Integration Services to set up a database for you.
- Select Essbase > Options and select the Style tab
to define styles for this sheet.
- In the Data Cells option group, select the Integration
Server Drill-Through check box and click Format.
Essbase displays the Font dialog box.
- Note:
- The style for drill-through cells may already be set as blue, bold, italic
font because you set the style in the previous exercise. If this is the
case, then go to Step 7.
- Select Bold Italic from the Font style list
box.
- Select Blue from the Color drop-down list, and click
OK to return to the Essbase Options dialog box.
Figure 187. Font Dialog Box Selection
- Note:
- In the Essbase Options dialog box, Essbase displays an example of the
selected style in the Sample box.
Figure 188. Sample Style for Drill-Through Data Cells
- In the Essbase Options dialog box, select the
Display tab and select the Use Styles check box.
Figure 189. Setting the Use Styles Option
- Click OK to close the Essbase Options dialog
box.
- Select Essbase > Retrieve to display the new style in the
spreadsheet.
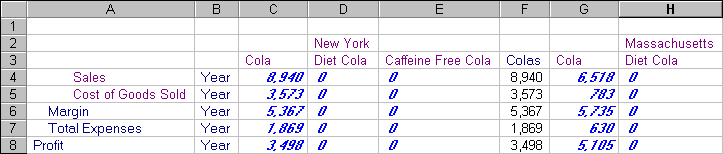
In this example, the sample drill-through report is associated with every
member intersection at the state level in the East region, so that all data
cells associated with an Eastern state and children of Cola are now displayed
in blue, bold, italic font.
Figure 190. Sample File with Drill-Through Style Applied
To access the sample drill-through report from the Essbase Spreadsheet
Add-in:
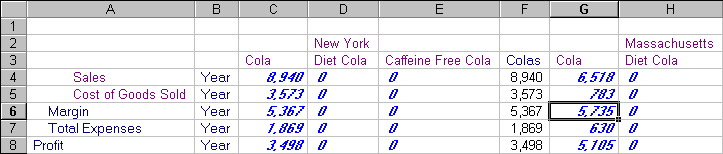
- Select any drill-through cell; for example, cell G6.
Figure 191. Selecting the Drill-Through Cell for the Measures Detail Report
- Note:
- If Essbase Integration Services is not running, drill-through does not launch
properly. For more information, contact the Essbase system
administrator.
- Note:
- If you are prompted with the Drill-Through Login dialog box to connect to
Essbase Integration Services and the relational data source, enter the
appropriate connection information. The person at your organization who
administers Essbase Integration Services and develops drill-through reports
should provide you with this information.
- Select Essbase > Linked Objects to open the Linked
Objects Browser dialog box.
Alternatively, select the Enable Linked Object Browsing check box
in the Essbase Options dialog box (Global tab), which
enables you to double-click a linked object cell to open the Linked
Objects Browser dialog box. This option works only with
single-cell selection. If you select a range of cells, use the
Essbase > Linked Objects menu command.
Figure 192. Linked Objects Browser Dialog Box with Drill-Through Entry Selected
- Select the drill-through report entry and click
View/Launch.
The Select Drill Through Report dialog box is displayed.
- Note:
- In the Select Drill Through Report dialog box, if the Customize button is
selectable, then you can customize the report. If more than one
drill-through report is displayed, then you can select from the different
drill-through reports. In this tutorial, only one report, "Measures
detail," is displayed and customizable.
- Select the Measures detail report from the Available Reports
list box.
Figure 193. Selecting the Sample Drill-Through Report
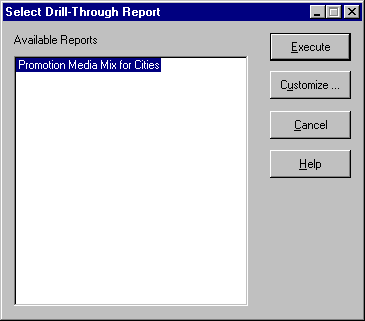
- Click Customize.
- Note:
- The Customize button may be selectable or not selectable for any given
report, depending on how the report was defined in Integration Services
Console.
Essbase Integration Services displays the first screen of the Drill-Through
Wizard.
Figure 194. Drill-Through Wizard Dialog Box, Introductory Screen
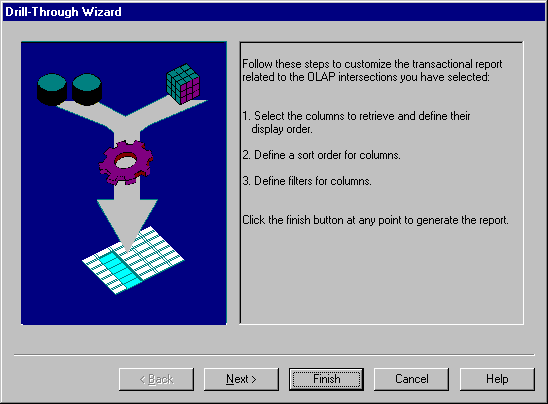
- Click Next to display the Select Columns and Display
Order dialog box.
Figure 195. Select Columns and Display Order Dialog Box
- Follow the steps in the next section, "Selecting and Ordering Columns", to select and order rows for the customized report.
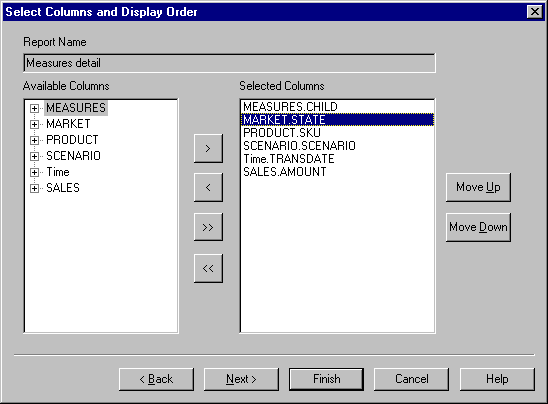
Using the Drill-Through Wizard, you can customize predefined drill-through
reports. The first task in the Drill-Through Wizard is selecting and
ordering columns to retrieve from the relational database. These
columns contain detailed information that is not available in the Essbase
database.
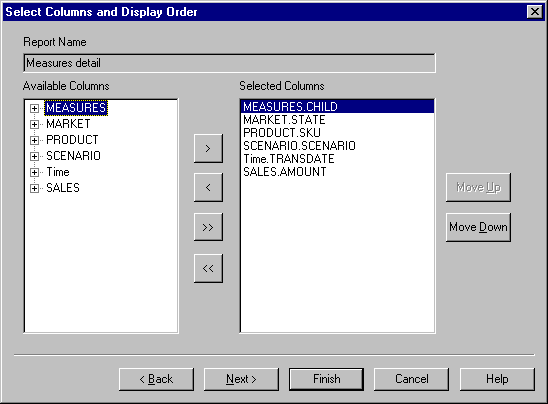
In the Select Columns and Display Order dialog box, you can select which
columns you want Essbase Integration Services to retrieve from the relational
data source. From this dialog box, you can also specify how the columns
are displayed in the resulting report.
The Available Columns list box displays a list of columns available from the
relational data source for this report (as defined in Integration Services
Console). The Selected Columns list box displays the columns from the
Available Columns list box in expanded form. You can remove columns
from the Selected Columns list box to exclude them from the drill-through
report.
In this example, the columns from the Available Columns list box are
selected for inclusion in the sample Measures detail report. These
columns are displayed in expanded form in the Selected Columns list
box.
To remove one of the selected columns from the drill-through report:
- In the Selected Columns list box, select the
MARKET.STATE column.
- Note:
-
To select multiple columns in the list that are not adjacent to each other,
hold down the Ctrl key and select each column. To select a range of
columns, hold down the Shift key and click the first and last columns in the
list, which also selects all columns in between them.
Figure 196. Selecting Columns to Remove From the Drill-Through Report
- Click
 to move the selected column from the Selected Columns list box
back to the Available Columns list box.
to move the selected column from the Selected Columns list box
back to the Available Columns list box.
- Note:
- To move a column from one list box to another, click
 or
. To move all columns from one list box to another, click
or
. To move all columns from one list box to another, click
 or
or
 .
.
- Click Next to display the Select Data Sort Order
dialog box, and follow the steps in the following section, "Ordering Data" to further customize the report.
- Note:
- When you finish customizing the report, click Finish at any time to generate
the report and view the results in a new sheet. The new sheet is placed
before the current sheet.
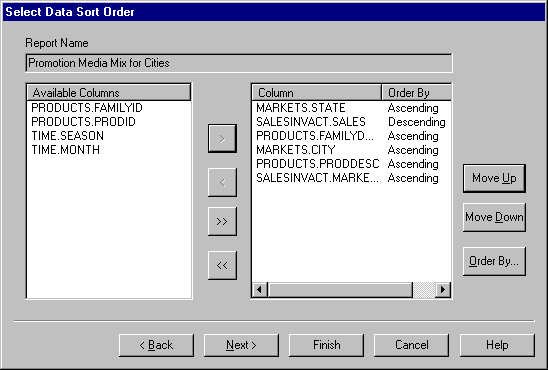
In the Select Data Sort Order dialog box, you can select an ascending or
descending sort order for the data in a column.
Sort order determines the order in which rows will be displayed in the
drill-through report. For example, you can sort the contents of the
Time.TRANSDATE column, which represents the transaction dates, in
ascending order in the drill-through report.
To define the sort order of rows in the drill-through report:
- In the Available Columns list box, select the
Time.TRANSDATE column.
The columns in the Available Columns list box are those that you
selected in "Selecting and Ordering Columns". The columns in the Column list box are those
for which a sort order has already been defined in Integration Services
Console.
If a data sort order was selected when the report was created in Essbase
Integration Services Console, the Order By list box displays that
selection. Otherwise, the default sort order is Ascending.
- Click
to move the Time.TRANSDATE column to the Column list box so
that you can define a sort order for the column.
- Note:
- To move a column from one list box to another, click
or
. To move all columns from one list box to another, click
or
.
Figure 197. Moving a Column to the Column List Box for Sorting
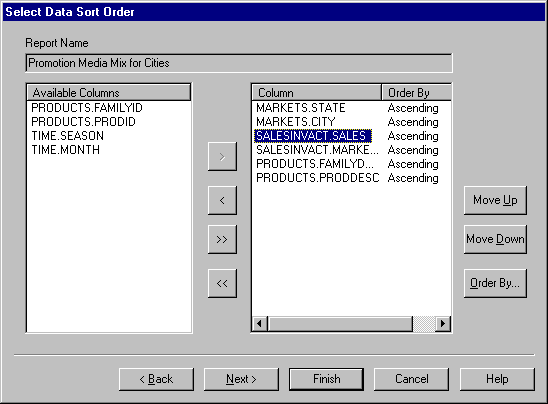
- In the Column list box, double-click the Time.TRANSDATE
column to change the data sort order from Ascending to Descending so that
transaction date values are displayed in reverse chronological order in the
drill-through report.
Figure 198. Selecting the Data Sort Order
- Click Next to display the Select Data Filters dialog
box, and follow the steps in the following section, Filtering Data to further customize the report.
- Note:
- Tasks that you should not perform as part of the tutorial are
shown in light-shaded boxes.
To change the data sort order for multiple columns at one time, perform
these tasks:
- Hold down the Ctrl key and select the desired columns from the
Column list box.
- Click Order By.
Essbase Integration Services displays the Order By dialog
box.
Order By Dialog Box
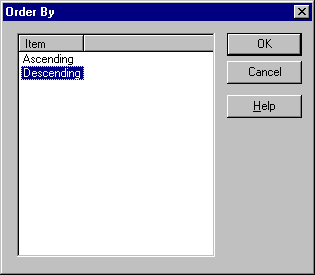
- Select Ascending or Descending and click
OK to return to the Selecting Data Sort Order dialog
box.
|
You can apply filters to determine what Essbase Integration Services
retrieves for the drill-through report. For any given column, you may
want to retrieve only data that meets certain conditions. For example,
the MEASURES.CHILD column in the sample database contains all children
of the Measures dimension. In the sample drill-through report, if you
did not apply a filter to this list of measures, Essbase Integration Services
would retrieve all children from the relational source, because the sample
drill-through report applies to all children of Measures. In this
section, you will apply a filter to the MEASURES.CHILD column so that
all children of Measures, except Misc, are included in the report.
- Note:
- When you apply a filter on a non-level 0 member using Essbase Integration
Services, the filter may return more members than expected. To work
around this problem, use the Drill-Through Wizard.
To define a filter:
- Select the MEASURES.CHILD column from the Column list
box.
The columns in the Column list box are those that you selected
in "Selecting and Ordering Columns".
Figure 199. Select Data Filters Dialog Box
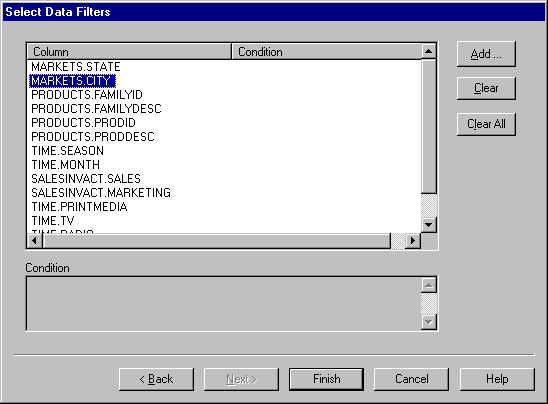
- Note:
- If there is a filter already attached to the column, it is displayed in the
Condition list box. The full string of the filter is displayed in the
lower Condition text box.
- With the MEASURES.CHILD column selected, click
Add.
The Set Filter on Column dialog box is displayed.
Figure 200. Set Filter on Column Dialog Box
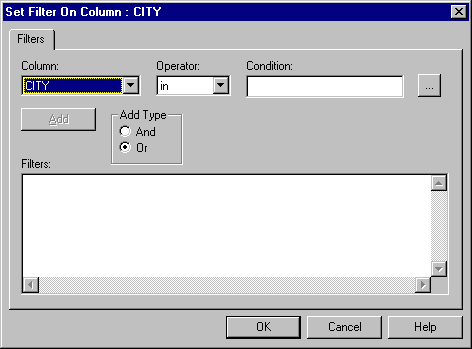
- Select CHILD from the Column drop-down list box.
The column displayed in the Column drop-down list box is the one
that you selected in "Filtering Data".
- Select the < > operator, which represents not equal to,
from the Operator drop-down list box.
- Note:
-
You can select multiple values at one time only if you have selected In or Not
In as the filter operator. For more information on filter operators,
see the Drill-Through online help.
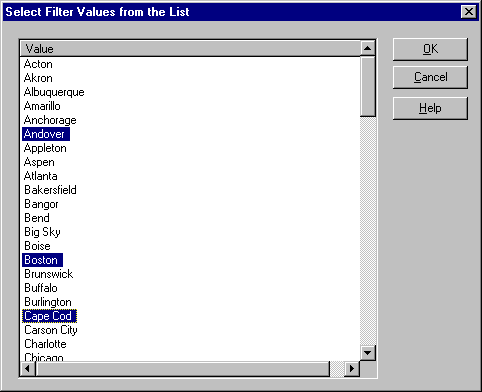
- Click the Browse
 button to open the Select Filter Values from the List dialog box,
which lists all possible values for that column.
button to open the Select Filter Values from the List dialog box,
which lists all possible values for that column.
The Select Filter Values from the List dialog box is
displayed.
- Note:
- Essbase Integration Services retrieves these values directly from the
relational data source. If the relational data source contains many
values, Essbase Integration Services confirms if you want to view them all
before it retrieves them from the data source.
- In the Select Filter Values from the List dialog box, select
Misc and click OK. The Set Filter On
Column dialog box is displayed.
Figure 201. Selecting Filter Values from the List
- Click Add to add the condition to the Filters list
box.
- Note:
- For information on using multiple filter conditions, see the Integration
Server Drill-Through online help.
The Set Filter on Column dialog box should now look like Figure Figure 202:
Figure 202. Defining a Filter for a Column
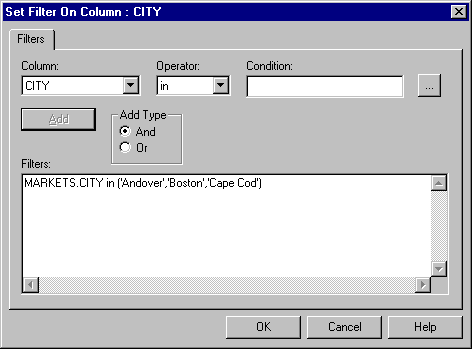
The filter defined above causes all children of Measures, except Misc data,
to show in the drill-through report.
- Note:
- The Add button becomes unselectable after creating the first filter, but
becomes selectable when you create another filter. In this tutorial,
you are creating only one filter. The And and Or options are used when
combining multiple filters. The default value is Or, which means that
Essbase Integration Services applies the filter if any of the conditions you
specify are met. If you select And, Essbase Integration Services
applies the filter only if all the conditions are met.
- Click OK to return to the Select Data Filters dialog
box. Notice that the filter defined in the Set Filter on
Column dialog box is displayed in the Condition list box and
text box of the Select Data Filters dialog box.
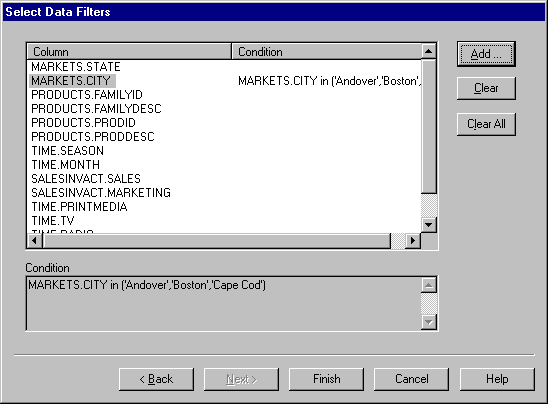
Figure 203. Result of Defining a Filter for a Column
- Note:
-
You can also create a filter by typing the filter conditions directly into the
Filters list box of the Set Filter on Column dialog box. For
more information, see the Drill-Through online help.
To delete a filter, select the filter and click Clear. To delete all
filters, click Clear All.
- Click Finish.
Essbase Integration Services generates the customized drill-through report
and displays the results in a new spreadsheet. The new spreadsheet is
added to the workbook before the current spreadsheet.
Figure 204. Customized Drill-Through Report
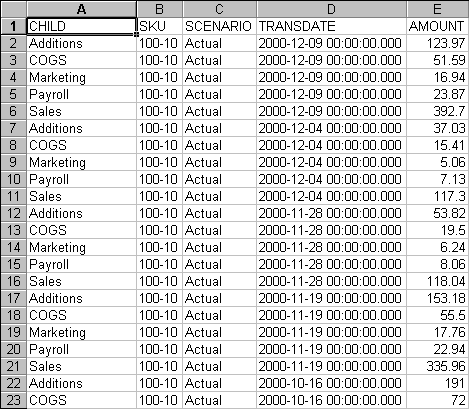
In this sample, the customized drill-through report reflects the
specifications that you set using the Drill-Through Wizard:
- The Time.TRANSDATE column is sorted in descending order, displaying
the transaction dates in reverse chronological order.
- All children of Measures, Additions, COGS, Marketing, Payroll, Sales, and
Opening Inventory, except Misc, are displayed as you specified in the
filtering part of the Drill-Through Wizard.
[ Top of Page | Previous Page | Next Page | Table of Contents | Index ]