Spreadsheet Add-in User's Guide for Excel
This section provides the following information to help you get acquainted
with Essbase Spreadsheet Add-in:
If you manually update your environment settings or if you have removed
Essbase Spreadsheet Add-in
from the Microsoft Excel environment, you must use the Excel facility to add
Essbase Spreadsheet Add-in into Excel. The facility adds the Essbase
menu to the Excel menu bar and points Excel to the Essbase Spreadsheet Add-in
file in the \Essbase\bin directory. This file is on the hard
drive of your PC, if that is where you installed Essbase Spreadsheet Add-in,
or on the network drive if that is where you set up your PC operating
environment to run Essbase Spreadsheet Add-in.
- Note:
- essexcln.xll is the add-in file for Excel 97, Excel 2000,
and Excel XP. Adding Essbase Spreadsheet Add-in into Excel 97, Excel
2000, and Excel XP modifies the Windows Registry. The Registry point to
where the Essbase Spreadsheet Add-in file is installed.
To add Essbase Spreadsheet Add-in to Excel:
- In Excel, select Tools > Add-Ins.
Excel displays the Add-Ins dialog box.
- Click the Browse button.
Excel displays the Browse dialog box.
- Select the file essexcln.xll in the bin directory where
you installed Essbase Spreadsheet Add-in on your PC hard drive (if you
installed Essbase Spreadsheet Add-in there) or in the bin directory where the
Essbase system administrator installed Essbase Spreadsheet Add-in on a network
drive (if you set up your PC operating environment to run Essbase Spreadsheet
Add-in there).
- Click OK twice to close the dialog boxes and start Essbase
Spreadsheet Add-in.
The Essbase startup screen is displayed.
If you do not see the Essbase startup screen or if your system does not
list the Essbase Spreadsheet Add-in menu options, see the
Installation Guide for troubleshooting
information.
Because Essbase Spreadsheet Add-in software for Excel is implemented as
anExcel add-in, you must start Excel from Windows to use Essbase Spreadsheet
Add-in software.
You must open a worksheet before attempting to connect to the
server. An attempt to connect to the server without opening a worksheet
results in an error message.
To begin an Essbase session:
- Start Excel.
After the Excel startup screen disappears, the Essbase startup screen is
displayed.
The menu should be displayed in the Excel menu bar. If you do not see
the menu, you may need to use the Excel add-in facility to add Essbase
Spreadsheet Add-in into Excel. For more information, see "Adding Essbase Spreadsheet Add-in".
The Essbase toolbar should also be visible. If you do not see the
Essbase toolbar, see Installing the Essbase Toolbar and Using the Essbase Toolbar.
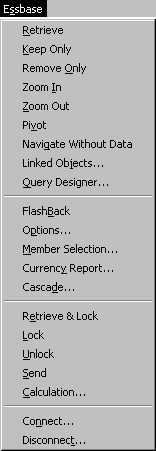
- From the Excel menu bar, select Essbase to open the
menu.
Figure 4. The Essbase Menu
- Note:
- If the Excel status bar is not displayed, you can display it by selecting
View > Status Bar.
Essbase Spreadsheet Add-in provides a convenient toolbar that displays
buttons for accessing most of the common Essbase commands without having to
open the Essbase menu. Prior to using the Essbase toolbar, you must
install the toolbar by opening an Excelfile that is provided as part of the
default Essbase installation. For more information on using the
toolbar, see Using the Essbase Toolbar.
To install the Essbase toolbar:
- Start Excel.
- Select File > Open.
- From the \essbase\client\sample directory, open the
esstoolb.xls file.
Depending on how software is installed on your PC, the file may not be
available or may be located in a different directory. Contact the
Essbase system administrator for more information.
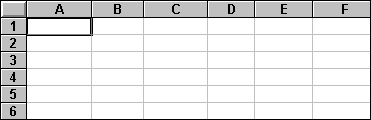
A blank worksheet opens.
Figure 5. esstoolb.xls File
- Note:
- If you are using Excel 97, two dialog boxes may be displayed when you open
the esstoolb.xls file. If so, click the Enable Macros
button on the first dialog box, and click OK on the second dialog box.
- Select File > Close to close the
esstoolb.xls file. You do not need to modify or save
the file.
You should not have to perform the toolbar installation procedure again
unless you delete the Essbase toolbar from the Toolbars dialog box in
Excel. If you delete the toolbar, perform the installation procedure
again.
- Note:
- If you have toolbars turned off in Excel, you do not see the Essbase toolbar
immediately. You must first enable toolbars. For more
information, see Using the Essbase Toolbar.
Essbase Spreadsheet Add-in for Excel features a convenient toolbar that
displays buttons for accessing most of the common Essbase commands without
having to open the Essbase menu. You can view a short description of a
button in a pop-up on the toolbar by moving your cursor over the
button.
- Note:
- Before you can view the Essbase toolbar, you must install it. See Installing the Essbase Toolbar.
To view the Essbase toolbar, select View > Toolbars > Essbase from
the Excel menu bar. A check box must be displayed next to Essbase in
the menu.
- Note:
- If you select the Essbase check box and click Delete, you must reinstall the
toolbar. See Installing the Essbase Toolbar for instructions.
The toolbar provides the following buttons:
Table 2. Essbase Toolbar
| Button
| Purpose
| Description
|

| Connect
| Enables you to connect to an Essbase server. When you click the
Connect button on the toolbar, Essbase displays the Essbase System Login
dialog box.
|

| Navigate with or without data
|
Toggles the Navigate Without Data feature, which tells Essbase to retrieve
or not to retrieve data when you perform navigational operations, such as
pivot, zoom in, zoom out, keep only, and remove only.
This button serves the same function as the Navigate Without Data check box
in the Essbase Options dialog box (Global tab).
|

| Retrieve
|
Retrieves data into the active worksheet. A retrieve request places
data at the beginning of the active worksheet. When you click the
Retrieve button, if you are not already connected to an Essbase server, the
Essbase System Login dialog box is displayed.
- Tip:
- If you have mouse actions enabled, you can retrieve data by double-clicking
the primary mouse button in any empty cell in the worksheet. To enable
double-click support, select Essbase > Options, select the Global tab, and
select the Enable Double-Clicking option. For more information, see Enabling Mouse Actions.
|

| Keep only
| Retains only the selected member (the active cell) or member range in the
worksheet. When you click the Keep Only button, all unselected members
are removed from the worksheet.
|

| Remove only
| Removes the selected member (the active cell) or member range from the
worksheet. When you click the Remove Only button, all unselected
members are retained in the worksheet.
|

| Zoom in
|
Retrieves and expands data from the Essbase server according to the options
specified in the Essbase Options dialog box.
- Tip:
- If you have mouse actions enabled, you can drill down on data by
double-clicking the primary mouse button in the cell that contains the member
you want to expand. To enable double-click support, select Essbase >
Options, select the Global tab, and select the Enable Double-Clicking
option. For more information, see Enabling Mouse Actions.
|

| Zoom out
| Collapses the view according to the options specified in the Essbase
Options dialog box in the cell that contains the member that you want to
collapse. To enable double-click support for drilling up, select
Essbase > Options, select the Global tab, and select the Enable
Double-Clicking option.
|

| Open Essbase Query Designer
| Opens the Essbase Query Designer, which makes it easy to define a page
orientation for dimensions and selected database members. You can also
save queries for later use. Essbase Query Designer is a new feature
designed to create report queries, view attributes, and perform calculations
based on attributes.
|

| FlashBack
| Restores the previous worksheet view.
|

| Set options
| Enables you to set display, zoom, mode, style, and global options for the
active worksheet to customize the behavior of Essbase Spreadsheet Add-in
software. When you click the Options button, Essbase displays the
Essbase Options dialog box.
|

| Select members
| Enables you to select members from the multidimensional database
outline. When you click the Member Selection button, Essbase displays
the Essbase Member Selection dialog box.
|

| Attach linked objects
| Enables you to attach comments or files to data cells. When you
click the linked objects button, Essbase displays the linked objects browser
dialog box.
|
Essbase Spreadsheet Add-in includes a context-sensitive online help
system. You access the Essbase Spreadsheet Add-in online help in one of
three ways. Which way you choose depends on the type of information
that you need,
The following terms are used throughout this guide to describe mouse
operations:
- Primary mouse button and secondary mouse
button describe the buttons on a two- or three-button mouse. Usually,
right-handed users configure the left mouse button as the primary button and
the right mouse button as the secondary mouse button. The primary mouse
button is the one that you use to start Windows applications, such as
Excel; the secondary mouse button is used for auxiliary
operations. The term click refers to use of the primary
mouse button. The term right-click refers to use of the secondary mouse
button.
- Select chooses the object that is under the cursor when you
press and release the primary mouse button. You can select a worksheet
cell, for example, by moving the cursor to the cell and pressing and releasing
the primary mouse button.
- Click (that is, both click and
right-click) describes a quick press-and-release action on a
command object. You can click a button, for example, to execute a
command.
- Double-click describes two quick press-and-release actions that
are executed in rapid succession. You can double-click an application
icon, for example, to start a Windows application.
- Drag describes a press, hold, and move action. You place
the cursor on an object, press a mouse button, hold the mouse button and move
the object, and release the mouse button when you reach your goal. For
example, you can highlight a range of cells in an Excel worksheet by dragging
the cursor over the cells.
- Note:
- uses a drag operation called a pivot. A pivot requires use
of the secondary mouse button. To execute a pivot, you must press and
hold the secondary, rather than the primary, mouse button while dragging the
selection.
Essbase offers enhanced mouse actions in Excel.
You can use the mouse to do any of the following:
- Retrieve data
- Drill down and drill up on database members
- Pivot (move or transpose) data rows and columns
- Access linked reporting objects
- Access linked partitions
To enable double-clicking to retrieve, drill down, and drill up on Essbase
data:
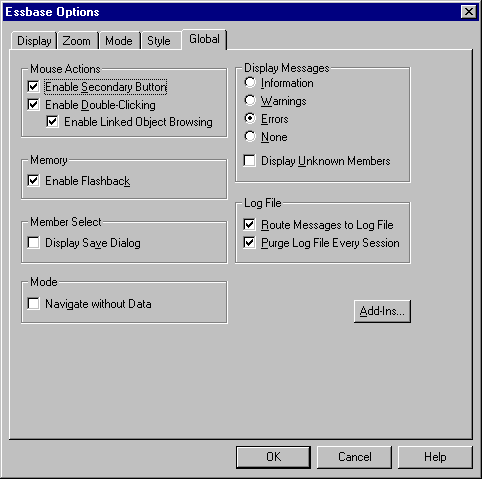
- Select Essbase > Options.
- In the Essbase Options dialog box, select the Global
tab.
- Select the Enable Double-Clicking check box.
When the Enable Double-Clicking check box is selected, you can
retrieve and drill down to more detailed data (primary mouse button) and drill
up to less detailed data (secondary mouse button). When the
double-clicking option is enabled, the Excel in-cell editing feature is
overridden.
Figure 8. Essbase Options Dialog Box--Global Tab
- Click OK to return to the worksheet.
For information about setting the primary mouse button to display the
Linked Objects Browser dialog box when you double-click a data cell, see the
Essbase Spreadsheet Add-in online help.
[ Top of Page | Previous Page | Next Page | Table of Contents | Index ]

