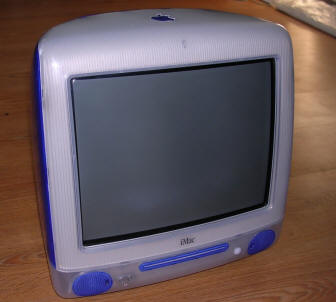
iMac G3 500MHz (slot-loading)
The lowest priced iMac, with CPU raised to 500MHz was
Apple's iMac for summer of 2000. It was a derivative of iMac DV SE, with
better mainboard and more memory.
Slot-loading iMacs have simple design, easier than iMac, so adding
memory doesn't require disassembly of half of iMac.
According to In-store Demo, new iMac had better graphical capabilities.
It is true, as 500Mhz iMac has better graphics card with 16MB of VRAM
and is ready for Apple's movie editing software.
| Model No: | M5521 | |
| Year: | 2000 | |
| Discontinued: | 2001 | |
| CPU: | PowerPC G3 500MHz | |
| RAM: | 256MB | |
| Max. RAM: | 1GB | |
| RAM Type: | 2 PC100 DIMMs | |
| Hard disk: | 10GB IDE, 3.5" SL | |
| Floppy drives: | None | |
| Other drives: | Slot-loading 24x CD-ROM | |
| Graphics: | 1024x768x24bit (max) | |
| Sound: | Stereo, built-in speakers | |
| Display: | Built-in 15" color CRT, VGA (15-pin D-sub) output |
|
| Dedicated OS: | Mac OS 9 | |
| Maximum OS: | Mac OS X 10.3.9 (10.4.11 for >400MHz models) | |
| Expansions: | USB, FireWire | |
| Connectors: | - 2 USB
connectors - 2 FireWire connectors - Microphone input (3.5mm jack) - Speaker output (3.5mm jack) - Telephone connector (modem) - Ethernet connector. - VGA output (rear cover) Reset and interrupt switches. |
|
My unit comes from magazine editorial. Unfortunately it's not in top condition, as I had to modify power switch (the mechanism was broken) and it has some scratches. Electrically it works perfectly, you can work on it even with Mac OS X 10.3.
One more thing: I have no idea how to overclock these mainboards, as my unit has different mobo than in earlier iMacs. The only thing: If you know how to do it and you plan to do it, don't overclock too much. It's cooled using thermal pad with computer's chassis, with no forced air flow so it can't radiate much excessive heat.
Here you'll find:
| Upgrading memory | Disassembly |
Memory upgrade
Very simple. Place it on a soft cloth on screen, and remove one cover by unlocking big screw, open it and here DIMMs are. You can put maximum of 1GB there. Most PC100 and PC133 modules work nicely.
Disassembly procedure (not including CRT/power supply assembly).
Easier than iMac 233MHz...
Removing
covers:
1. Place computer on a soft cloth, front side facing floor.
2. Remove 4 screws holding big cover: Two are exposed, to access two
others you have to remove upper cover (VGA connector cover) by putting a
flat screwdriver between it and the rest of computer and prying it.
Remove two outer ones.
3. Remove cover by opening top part and, when it goes off, sliding it
off by pulling its flip foot.
4. Now you have a RF shield. Remove 6 screws: Two lower, to drives bay,
two on the outside of these (edges), two on its top.
5. Carefully open RF shield using VGA connector as hinge. As it opens,
remove it from hinge. With this move you won't break VGA port off.
Removing drives:
1. Remove covers.
2. Remove 4 screws near speakers keeping CD/HDD cage in place with
chassis.
3. Remove HDD power cable and both (HDD and CD-ROM) data cables.
4. Tilt the CD/HDD chassis forward and slide it out the iMac.
5. Remember not to remove CD drive while removing HDD. Screws are
difficult to distinguish.


