|
Music Theory Drills
Part 2
by Duane Tutaj
In this issue I will continue with Part 2 of my Music Theory Drills. This installment will test the student on note and rest symbol identification.
In music theory, there are certain symbols that represent rhythm values. Note symbols have four parts: note head, stem, flags, and dots. Rests are different. Some are boxes while others are represented by curved and diagonal lines. Rests can also have dots.
You will be given a chance to see each symbol and its corresponding name by pressing option 5 on the menu screen.
The Note Symbol Drill starts by displaying two title screens and playing a new version of the arcade song from the last installment. This is followed by the instructions. Next comes the menu screen.
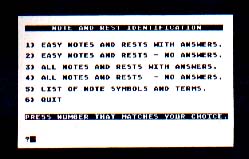
There are four options of drills and two additional options available from the menu.
Option 1 consists of a question drill on the 10 simple note and rest symbols. This quiz tells you the correct answer if your choice was incorrect. Option 2 consists of the same 10 notes and rests but only prints CORRECT or INCORRECT after your response. Option 3 adds five more rhythmic symbols and shows the correct answers. Option 4 is similar to Option 2 but includes the five additional symbols.
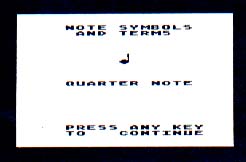
Option 5 displays the list of musical symbols and their corresponding terms. (See Fig. 1.) Beginners can study these symbols and their names before running the rest of the drills. Option 6 is the exit from the program.
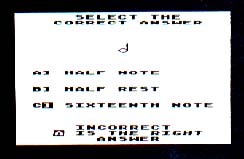
Once a level is chosen, the DRILL screen appears and asks you to select the correct answer. A note or rest symbol drawn by a custom character set appears, followed by the three choices. By using a joystick, you can move the blue bracket behind the A, B, or C. When the blue bracket is placed correctly, push the trigger button to enter your selection. The results will appear on the bottom of the screen. When you are ready for the next question, move the joystick in any direction. This will cause the question and answers to be wiped from the screen and the next question to appear.

|
| FIG. 1 |
After the 10 or 15 questions have been answered, your results will be printed on the screen and you will be given an option to run the same drill again, return to the menu, or quit.
A nice feature of this program is that whenever there is a correct match to a question, that question is removed from the list of possible questions. However, if a wrong answer is given, that question may reappear, with the answer choices being scrambled. This will force the user to read the correction and remember the correct answer.
By mastering the last Music Theory Drill installment (Note Name program) and this Note Identification program, you will be able to look at traditional music notation and translate the printed symbols to the correct names of the notes and their rhythmic equivalent. This will enable you to transfer the music into number values taken from any of the reference charts of the Atari Sound Commands.
For instance, the note located on the bottom line of the treble staff is E and has a number equivalent of 96 in the Sound command (Sound 0,96,10,10). By using the following values for the various rhythms you will be able to play each sound for its appropriate length.
|
Whole note Dotted half note Half note Dotted quarter note Quarter note Dotted eighth note Eighth note Sixteenth note |
-- 320 -- 240 -- 160 -- 120 -- 80 -- 60 -- 40 -- 20 |
If you need a rest, use the sound statement of Sound 0,0,0,0 for the appropriate length. Here is an example of the first four notes of the song JOY TO THE WORLD.

|
| Fig. 2 |
10 SOUND 0,60,10,10
20 FOR J =1 TO 80:NEXT J
30 SOUND 0,64,10, 0
40 FOR J =1 TO 60:NEXT J
50 SOUND 0,72,10,10
60 FOR J =1 TO 20:NEXT J
70 SOUND 0,81,10,10
80 FOR J =1 TO 120:NEXT J
90 SOUND 0,0,0,0
This type of programming works but is very inefficient. See my use of arrays in the arcade music section of the Note Identification program for a tighter use of code.
In the next installment I will have a slot machine game that makes the user determine the combined rhythmic total of the various notes and rests.
Program Description
The program starts by initializing five string variables and two arrays. The string variables will contain the answer choices and also will print the music symbols to the screen with a custom character set. The two arrays are for keeping track of which questions have been answered correctly and the arcade music sound routine. The keyboard is opened up for the GET command and the screen is made blank to increase the speed of moving and drawing the custom character set.
Lines 100 to 160 jump to the subroutines that write the character set, draw the title screen, play the arcade music, print instructions and display the menu screen. (See Fig. 2.) The question array is also filled with zeros and the counters and scoring variables are set before the drill begins.

|
| Fig. 3 |
Lines 200 to 210 print the Drill program heading and then goes to the main loop at line 1000.
Lines 299 to 350 contain the various sound routines used in the program.
Lines 1000 to 1320 contain the main loop of the program. The first step is to go and get a note or rest symbol. The program then places two more possible answers in the variables B and C. The RND function then generates a number from 1 to HM (which is either 10 or 15). A check is made to see if the chosen music symbol is also that number, if not, then a third choice is generated. This all takes place in lines 1050 to 1080.
Next, the music symbol and answer choices are printed to the screen. Lines 1200 to 1216 contain the joystick routine that moves the blue bracket corresponding to your choice of answers. By adding 128 to CHR$(93) we get a blue bracket. To print the gold bracket just use CHR$(93).
If the joystick is moved up, S is given a value; a sound is played and then a jump is made to the correct line that positions and prints the new blue bracket. Next, a gold bracket is printed in the former location. A similar set of commands is followed when the joystick is moved down.
After the bracket is moved (or if you do not move the joystick) a check of the trigger is made to see if you have entered your selection. If not, there is a return to line 1203 to read the joystick again.
If you selected an answer, a check is made to see if it matches the correct answer (A). If you are correct then the right variable R is incremented. A 1 is placed in the question array to prevent using that question again and then the correct sound is played. The message CORRECT is printed to the screen and then a jump is made to 1300 to check for an end of quiz, followed by a check to see if the joystick is moved. If the joystick is moved then the music symbol and answers are all erased from the screen with an appropriate sound. The program then returns to line 1000 and starts the main loop again.
If a question is answered wrong, the variable W is incremented, the incorrect sound is played and the INCORRECT message is shown depending on whether the correct answer should be displayed or not. (See Fig. 3.) This is all done in lines 1230 to 1260. A jump to 1300 is made to check for end of quiz. If not, the screen is erased and the loop is started over again.
Lines 1500 to 1655 are the scoring routine with the results printed on the screen. You may run this quiz again, go to the menu screen or quit.
Lines 2000 to 2115 contain the routine that selects the music symbol, checks to see if it had been used before, gets the position for the correct answer and prints the music symbol to the screen.
Lines 3000 to 3330 get the answer strings and print them on the screen based on where the correct answer will be.
Lines 15000 to 15100 contain a series of short routines that will move the existing ROM character set to RAM and then change a couple of characters.
Lines 20000 to 20070 contain the title screens and call the arcade music routine at line 25000.
Lines 20100 to 20175 contain the menu screen routine.
The arcade music routine is located in lines 25000 to 26155. A short explanation on how this works will enable you to use this same routine in your programs.
Restore the correct Data line to make sure that the correct data is read into the sound array. Then read four values by using a short for-next loop. If the Data statement contains the value of 9999 then the routine will end. Now that the four values have been placed into the YY array we are able to play four voices at one time by using these values in the four Sound statements.
The use of Setcolor in line 25315 just changes the colors in the title screen. After the tune is played, turn off all the Sound statements and then return to the rest of the program.
You will notice that I do not use any for-next loops for delays in this routine. That is because each note is based on the shortest value needed in a song. In this tune, the shortest value is an eighth note and therefore, each of the four values represent one eighth note value of sound. When a longer value is wanted just repeat the same pitch number in the next four Data values. Look at line 26000 and you will see that while the 1st and 5th pitch number changes the 4th and 8th number stays the same. This results in the melody playing two different eighth notes while the bass line holds a quarter note. Careful examination of this routine will give you better insight into how you can play four-part songs in any of your programs.
Lines 28000 to 28120 print the various music symbols and their corresponding term names to the screen as requested from the menu screen.
Lines 29000 to 29110 contain the routine that prints the instructions on the screen.
I hope that this program will generate many ideas on how to use the various routines in your own programs. If you come up with any interesting combinations, let me know.
Listing: MUSICDR2.BAS Download