Friends Of The Turtle
P.O. BOX 1317
LOS ALTOS, CALIFORNIA 94022

David D. Thornburg
LOS Altos, CA
I want to thank all of you who have taken the time to write me letters in support of Friends of the Turtle. I am busy sending answers to your questions. If you haven't heard from me, please be patient–I answer all my letters personally, so it takes me a while to catch up.
Many of the letters expressed the hope that turtles really are for everyone–expert and neophyte alike.
They are.
My interest in turtle graphics (and in the computer languages LOGO and PILOT) comes from the success I have had teaching programming to audiences as diverse as second graders and professional artists.
Friends of the Turtle is becoming international in scope, with members writing from places as far away as England and Argentina. Horacio Reggini wrote from Argentina to tell me of his work with LOGO and children. As a sign of their level of interest, he sent me a brochure describing the Spanish translation of Papert's Mindstorms (called "Desafio a la mente").
If you don't have Atari PILOT, TI LOGO, or one of the other languages which supports turtle graphics, then watch this column for announcements of new languages–there is a lot of activity in this area.
Several owners of the new IBM computer wrote me for information. While I don't know of any commercial turtle graphics packages for that machine yet, several programmers wrote to tell me they are working on the problem. Any computer with a graphics display should be able to support this graphics environment as long as someone is willing to create the language. I remember back in 1978 when WSFN was released as a turtle graphics language for the PET by the Peninsula School Computer Project (Peninsula Way, Menlo Park, CA 94025). It shouldn't be too hard to get this language to run on the VIC, or on the forthcoming $150 Commodore Ultimax. If you enjoy writing languages, keep me informed of any turtle languages you create.
Visible Vs. Invisible Turtles…
Some of the more sophisticated languages give the user the option of a visible turtle whose orientation can be seen as it moves around the screen. While experienced programmers usually don't use this feature, it can be quite valuable as a training tool.
Those of you using Atari PILOT know that this language does not contain a visible turtle. Since there wasn't room to incorporate this feature into the language, I decided to create one of my own called VISITURT.
VISITURT is an example of a PILOT-based turtle graphics program which illustrates some important ideas. If you have Atari PILOT, you may want to use this program to introduce turtles to your friends. If you use other languages, you might want to try converting this program to work on your system. In addition to generating a visible turtle, this program automatically alternates between DRAW and TURN commands to allow first-time users to create pictures by entering the distance or angle for each command. While the program itself is designed to be used by beginners. I will assume that those of you who are going to enter this program already understand enough about PILOT to follow the listing.
VISITURT uses three procedures: *ERASE, *ACCEPT, and (of course) *TURTLE. Since these procedures are needed by the main program, we will describe them first.
The ERASE procedure clears the screen, moves the turtle to the origin, makes it turn straight up and draws a fresh copy of the turtle's picture.
Here is its listing:
*ERASE
GR: GOTO 0,0; TURNTO 0; CLEAR
U: *TURTLE
E:
The ACCEPT procedure does two things. It accepts input from the keyboard and places the numeric value of the input in the variable #A. If the user enters the letter E, this procedure will use the ERASE module to reset the screen. Here is its listing:
*ACCEPT
A: #A
M: E
UY:*ERASE
E:
The TURTLE procedure has one task – to draw a picture of the turtle on the screen. As you can see from its listing, this procedure is made from a combination of commands which TURN, which GO (move without drawing), and which DRAW. Except for small movements to insure proper centering of the figure, this procedure works this way. First the turtle is moved straight ahead by four units to the edge of a 30-sided body. The body is then drawn by the command 30(DRAW 1; TURN 12). This is the Atari PILOT short hand for "thirty times draw 1 unit and turn 12 degrees." Next, the turtle is repositioned and the head is drawn with a 10-sided polygon. Finally, the turtle is returned to its starting position and orientation. If we didn't make this last step, our turtle wouldn't be very useful. Our goal is to draw a picture of a turtle around the turtle's starting location and to leave the turtle in the same place it was when we started. The listing for this procedure is shown below:
*TURTLE
GR : GO 4; TURN -90; GO 1; TURN 180
GR : 30(DRAW 1; TURN 12)
GR : GO 1; TURN 180
GR : 10(DRAW 1; TURN 36;
GR : TURN 90; GO -4
E :
Finally we are ready for the main procedure – *VISITURT. Here is its listing:
*VISITURT
U : *ERASE
T : WELCOME TO THE VISIBLE TURTLE
T :
J : *STARTHERE
*MASTERLOOP
T : TURN\
U : *ACCEPT
GR : PEN ERASE
U : *TURTLE
GR : TURN #A
*STARTHERE
GR : PEN YELLOW
U : *TURTLE
T : DRAW\
U : *ACCEPT
GR : PEN ERASE
U : *TURTLE
GR : PEN RED
GR : DRAW #A
GR : PEN YELLOW
U : *TURTLE
J : *MASTERLOOP
E :
The idea behind this program is that the turtle is first drawn on the screen. Once the user indicates how much to draw or turn (since these commands appear alternately), the turtle is then erased (by drawing it again with the ERASE pen), a line is drawn, or the turtle is turned, and the picture of the turtle is drawn in its new location with the yellow pen.
If you use Atari PILOT, you might want to enter this program by keying in the *VISITURT procedure first. This way, when you type RUN, the correct procedure will be started first. If you key the procedures in any other order, you will have to use the VISITURT procedure (by typing U: *VISITURT) in order to start the program properly.
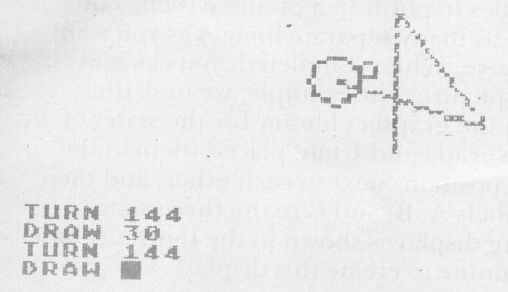
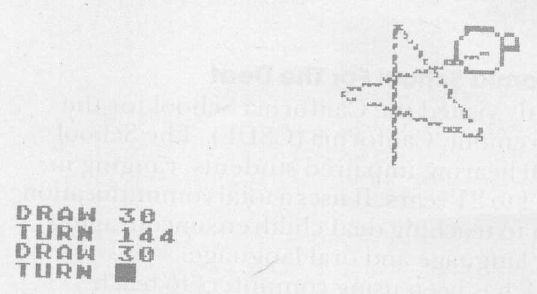
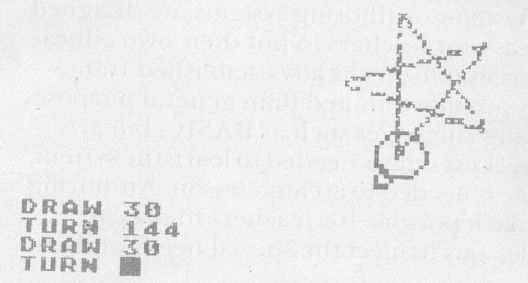
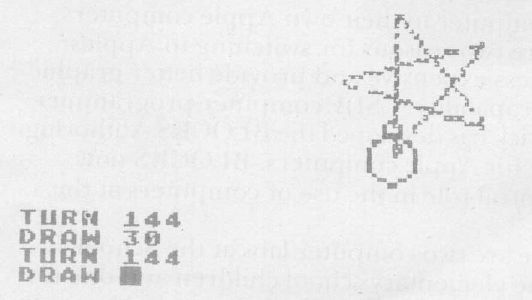
Those of you who are familiar with PILOT should recognize most of the commands used in this program. The following figures show the VISITURT display during the creation of a 5-pointed star.


While this program was written in Atari PILOT, those of you familiar with other turtle languages should be able to convert it for your system.
Next month we will cover some basic ideas about turtle paths. That topic applies to all turtle implementations and should be of interest to turtle users of all ages.
Until then, please feel free to write me with your programs and pictures. I hope to be able to share your efforts with your fellow readers.


